How to Replace the Sky in Videos Using Capcut
Creating cinematic video content is now easier than ever with powerful mobile editing tools like CapCut. Whether you’re an aspiring filmmaker, content creator, or social media editor, learning how to replace the sky in your video can instantly make your footage more dramatic, vibrant, and professional.
In this complete guide, you’ll learn how to do sky replacement in CapCut using your own custom photos or video clips of the sky — not just built-in effects. This method gives you full creative control and helps your content stand out in a sea of templated edits. How to Replace the Sky in Videos Using Capcut
🌤️ Why Replace the Sky in Your Videos?
The sky plays a major role in setting the mood and atmosphere of a scene. Replacing a dull, overexposed, or cloudy sky with a dramatic sunset or moody storm can:
- Make ordinary footage look cinematic
- Improve visual storytelling
- Enhance color contrast and overall aesthetic
- Help with branding and style consistency
Unlike apps with automated AI sky replacement, CapCut gives you a manual, creative way to replace the sky using the Overlay and Mask tools.
📲 What You Need:
- CapCut installed on your mobile device
- Your main video with visible sky portions
- A custom photo or video of the sky (sunset, blue sky, night, clouds, etc.)
For best results, make sure your sky footage matches the lighting and perspective of the original video.
🧑🏫 Step-by-Step: Replace the Sky Using Overlays in CapCut
✅ Step 1: Start a New Project
- Open CapCut and tap on “New Project”
- Select your main video file and import it
- Make sure the sky is clearly visible in the clip
- How to Replace the Sky in Videos Using Capcut
✅ Step 2: Add Your Sky as an Overlay
- Tap the “Overlay” option from the bottom menu
- Choose “Add Overlay”
- Select your custom sky photo or video and add it to the timeline
- Use two fingers to resize and position the sky to fully cover the sky area in your main footage
✅ Step 3: Apply a Mask for Realistic Blending
- Tap the sky overlay, then tap “Mask”
- Use Linear, Rectangle, or Split masks depending on the scene
- Adjust the position and feather the edges to create a natural blend between the sky and foreground
- Rotate the mask if necessary to follow the horizon or roof lines
This is the most important step for making the sky replacement look natural.
✅ Step 4: Match the Lighting and Color
To make the overlay blend seamlessly:
- Tap on the overlay > go to Adjust
- Modify Brightness, Contrast, Saturation
- You can also use filters to match the overall mood of the original video
Color matching helps avoid any obvious transition lines or mismatched tones.
✅ Step 5: Use Keyframes (If Needed)
If your camera is moving in the original clip:
- Tap the overlay > move the playhead > adjust position slightly
- CapCut will automatically insert keyframes to animate the movement
- This keeps your sky aligned as the video moves
It’s not mandatory for static shots, but it’s a must for dynamic videos.
How to Replace the Sky in Videos Using Capcut
✅ Step 6: Add Final Touches
Enhance the scene further by:
- Adding cinematic color grading
- Applying motion blur or glow
- Adding sound effects (wind, thunder, birds)
- Including a cinematic title or logo animation
✅ Step 7: Export Your Video
- Tap the Export icon (top-right)
- Choose 1080p or 4K resolution for best results
- Save to your gallery or share directly to Instagram, YouTube, TikTok, or Reels
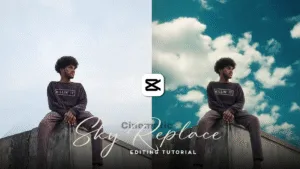
🌈 Real Example: Before & After Sky Replacement
In the shared Before/After image, a temple scene was completely transformed:
- Before: Overexposed white sky, flat lighting
- After: Warm, golden-orange sky with cinematic tones
This shows the true power of sky overlays in CapCut. With the right mask and color balance, the scene goes from average to visually stunning.
⚡ Pro Tips for Better Sky Replacement
- Use sky clips that match the lighting angle of your main video
- Shoot your own sky videos in slow motion or 4K for a premium look
- Use tripod shots for easier masking
- Avoid harsh shadows unless you can match them in both clips
- Use overlays with some motion (clouds drifting, sun setting) for realism
⚠️ Limitations
- CapCut doesn’t offer automatic sky segmentation like some desktop software
- Manual masking may require time and precision
- Fast camera movement or tree shadows may require advanced editing tools like Adobe After Effects or DaVinci Resolve
Still, for mobile creators, CapCut’s flexibility with overlays makes it incredibly powerful. How to Replace the Sky in Videos Using Capcut
🎯 Conclusion
CapCut’s overlay and mask features allow you to replace skies creatively, using your own media for a fully custom aesthetic. Whether you’re going for a dreamy sunset, dramatic storm, or night sky — this method puts the full power in your hands.
The best part? You don’t need a desktop or high-end software to do it. With just your phone and a bit of patience, you can turn any ordinary video into a cinematic masterpiece.
So next time you see a boring sky in your footage, remember — CapCut and a little creativity can bring your skies to life
How to Replace the Sky in Videos Using Capcut
How to Replace the Sky in Videos Using Capcut
How to Replace the Sky in Videos Using Capcut